
-
Batch Convert HEIC Files to JPEG on Windows
I got a new iPhone recently, and getting the photos off of it onto my PC in a way in which Lightroom could import them was a painful experience to say the least. There are a few settings on the iPhone now which cause the photos to be stored in a new HEIC format from Apple, instead of plain old JPEG. When connecting my iPhone to my Windows PC I had all sorts of issues with the PC even recognizing the phone as a storage device. To do so I had to turn off the automatic conversion of photos from HEIC while copying to the PC, and also disable the automatic compression to HEIC entirely, and turn off some iCloud settings.
I initially recommended IfranView here. DO NOT USE IT; it strips all metadata from the photo files when converting to JPEG, making them useless in Lightroom.EVENTUALLY I ended up with all the HEIC photos from my phone on my PC and I needed a way to convert them to JPEG en masse so I could get them into my old version of Lightroom. I used a program called Converseen for the batch conversion. I was a little wary of it at first because it looked like one of those shady websites which trick you into downloading crap and often show up high on Google results. However the software worked great and didn’t install anything untoward. I just had to add the HEIC images and I could select an output format and destination, and the whole thing converted fine.
And that was it! The conversion took a little while but I was left with good old JPEG files.
-
HiDPI Fix for Spotify on Ubuntu
There are many HiDPI/4K scaling issues on Ubuntu and Linux in general, and one of the most annoying is that Spotify becomes a music player for ants. To fix the tiny UI, you can first find where Spotify is installed on Ubuntu by searching for it in Applications, right clicking on the application and clicking properties. A couple of examples of what the file location could be:
- /var/lib/snapd/desktop/applications/spotify_spotify.desktop
- /home/martin/.local/share/applications/spotify.desktop
If you edit the file in vim you will see an Exec command that looks something like this:
Exec=spotify %UYou can add
--force-device-scale-factor=1.5to the command and this will fix the HiDPI scaling issue for you. You will just have to relaunch Spotify for this to take effect. See https://community.spotify.com/t5/Desktop-Linux/Linux-client-barely-usable-on-HiDPI-displays/td-p/1067272 for more information.After a while I updated Spotify and I got a newer version installed using snap. If you are using the newer snap install you do the same, only in the /var/lib/snapd/desktop/applications/ directory which will be shown in the spotify.desktop file. For example the snap Exec command may look something like this:
Exec=env BAMF_DESKTOP_FILE_HINT=/var/lib/snapd/desktop/applications/spotify_spotify.desktop /snap/bin/spotify --force-device-scale-factor=1.5 %UFor more information on the snap fix check out this post https://community.spotify.com/t5/Desktop-Linux/Spotify-Hi-DPI-Fix-for-Snap-install/td-p/4576328.
-
Taming power-hungry Linux laptops
My Discourse laptop is an XPS15 7590 with the following specs:
- 32 GB, 2 x 16 GB, DDR4, 2666 MHz
- 1 TB M.2 PCIe NVMe Solid-State Drive
- NVIDIA® GeForce® GTX 1650 4GB GDDR5
- 15.6” 4K UHD touch display
Out of the box, after installing Ubuntu and KDE plasma, this thing on battery power acted like Daniel Plainview in There Will Be Blood.

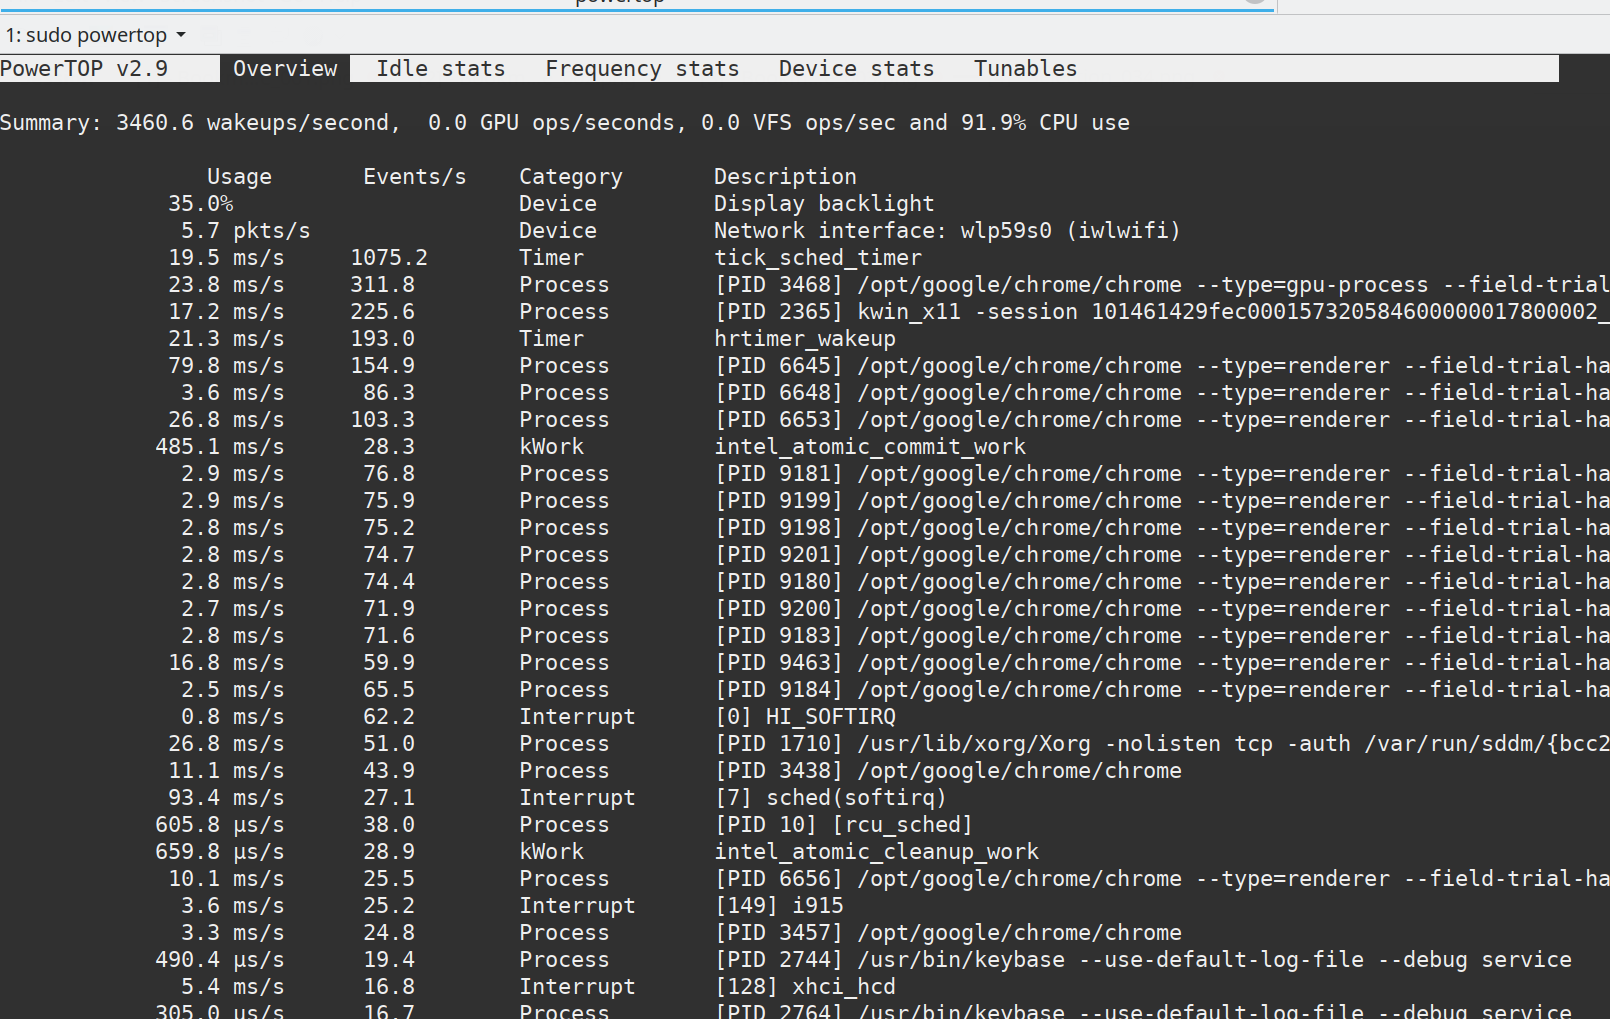
I got around 2 hours of battery life, 3 hours if I changed the resolution from 4k to 2k and dimmed the screen. The laptop was consuming between 40W and 50W of power. This isn’t great obviously, so I am posting here to list out some of the things I did to improve the battery life. The main secret is disabling the beastly graphics card which is not really needed for software development work in general.
- Install
powertopto get a summary of what is using all the power on your computer, as well as a general overview of the wattage being consumed. The output looks like this:
-
Run
sudo powertop --auto-tuneto automatically tune some of the settings for power, this will save you a small amount of watts. -
Install
nvidia-primewhich is used to disable the dedicated GPU. Runsudo prime-select intelto switch to the onboard graphics profile and reboot. This saved me about 10-15W off the bat. -
Install
tlpwhich is a battery management tool for Linux. Then, all I did was start the service and apply the default power saving settings then rebooted.
sudo add-apt-repository ppa:linrunner/tlp sudo apt-get update sudo apt-get install tlp tlp-rdw sudo systemctl status tlp sudo tlp start- Finally install Bumblebee which is more NVidia management stuff
sudo apt-get install bumblebee bumblebee-nvidia primus linux-headers-genericand reboot. Then runsudo tee /proc/acpi/bbswitch <<<OFFto completely turn off the NVidia card and reboot again. You may have to keep running this bbswitch command, I haven’t quite figured this part out yet. If it seems like my watt usage is really high I just run it again.
After this was all done here was my final reading from powertop (the battery was already drained ~10-15% here):

The wattage used went from 40W-50W to 10W-15W! And the battery life is now up to a more respectable ~6-7 hours. I was pretty stunned by this, thanks to Sam and the other Australian Discourse team at our Xmas lunch for convincing me that this kind of abuse of power is NOT OKAY and putting me onto disabling NVidia. Now all I have is…

-
Six weeks at Discourse
I meant to make a post about this when I started, but I have now been working at Discourse as a Software Engineer for six weeks!

The best things about working at Discourse are:
- The team (39 people and growing, largest I have ever worked on) is fully remote and distributed across every continent! (well, except Antarctica)
- Asynchronous work culture has been the core of the company since its inception. Discourse bleeds asynchronously!
- The team is full of ridiculously talented people who are generous with their knowledge. Everyone is a stellar written communicator.
- The codebase is fully open-source and is varied. On any day I can be working on the huge core product, a plugin, a theme component, or contributing to an open-source project Discourse uses.
- There is a lot of reading and a lot of writing, which is kind of a thing of mine.
- Everyone is treated like grown-ups, and trusted to do their work on their own schedule.
- How much more time do you have? I can keep listing things!
I am over the moon with this job and still pinch myself each day when I think about where I work and who I work with. 🌟

-
CSV header converters in Ruby
The CSV library in the Ruby stdlib is a really great and easy to use one, and I’ve often used it for data migrations and imports. When importing data I often find it useful to validate the headers of the imported CSV, to ensure that valid columns are provided. Some users may provide columns in different cases to what you expect or with different punctuation (including spaces etc.). To normalize the headers when parsing a CSV, you can use an option passed to
new(other methods such aparse,read, andforeachaccept the same options) calledheader_converters. Here is a simple example of how you can convert the headers of the parsed CSV to lowercase:### # Source CSV looks like: # # First name,last Name,Email # Abraham,Lincoln,alincoln@gmail.com # George,Washington,gwashington@outlook.com downcase_converter = lambda { |header| header.downcase } parsed_csv = CSV.parse('/path/to/file.csv', headers: true, header_converters: downcase_converter) parsed_csv.each do |row| puts row['first name'] # => Abraham # => George endSimple as that. You can do anything to the headers here. There are also a couple of built in header converters (
:downcaseand:symbol) that can be used, and an array can be passed as an argument, not just one converter. Converters can also be used for cells in the CSV rows as well, not just headers. The documentation for the RubyCSVclass is quite clear and helpful, take a look to see all the other myriad options for reading and writing CSVs in Ruby.Originally, I found this solution and tweaked it a bit from this StackOverflow answer - https://stackoverflow.com/questions/48894679/converting-csv-headers-to-be-case-insensitive-in-ruby
-
Per-page background images using Prawn and Ruby
Prawn is an excellent PDF generation library for ruby, and we use it for all our PDF needs at work. Their manual is some of the best documentation I have read. Recently, I needed to set a different background image on every page of a PDF I was generating. The prawn documentation, while good, only shows how to use a background image for the whole PDF:
img = "some/image/path.jpg"

Prawn::Document.generate(filename, background: img, margin: 100) do |pdf|
  pdf.text 'My report caption', size: 18, align: :right
end
So, I decided to dig into their source code to see how they rendered the background image. After a short search I found what I needed. Turns out, this works for rendering multiple different background images! In prawn you can call
pdf.start_new_pageto start a new page, and on each new page I would call the following to set the new background for that page:background_image_path = 'some/path/for/this/page.jpg' pdf.canvas do pdf.image(background_image_path, scale: 1, at: pdf.bounds.top_left) endI was able to generate the PDF with different background images perfectly with this code.
-
Prevent remote: true links opening in new tabs or windows in Rails
In Rails, you can use the option
read more...remote: trueon forms and links for Rails to automatically send AJAX requests when the form is submitted or the link is clicked. I plan to write a more in-depth article about this extremely useful feature in time, but essentially you just need to add anX.js.erbfile in your views directory for your controller, whereXis the action, and Rails will deliver this JS file as a response to the AJAX request and execute it. Now, most of the time you will not want these AJAX/JS-only routes to render a HTML view, but by default users can use middle click or open theremote: truelink in a new tab, which will show aActionView::MissingTemplateerror because there is noX.html.erbfile present. -
ImageMagick unable to load module error on AWS Lambda
Last Friday we started seeing an elevated error rate in our AWS Lambda function that converted single page PDFs into images using ImageMagick. We had been seeing the same error crop up randomly in around a two week period before Friday, but we were busy with other things and didn’t look too deeply into it. This was a mistake in retrospect. Below is the error in question:
Error: Command failed: identify: unable to load module `/usr/lib64/ImageMagick-6.7.8/modules-Q16/coders/pdf.la': file not found @ error/module.c/OpenModule/1278.
identify: no decode delegate for this image format `/tmp/BEQj9G8xj1.pdf' @ error/constitute.c/ReadImage/544.
To figure out the dimensions of the PDF, to convert it to an image, and to optimize the size we were using the gm nodejs package. This is just a friendly wrapper around calling
ImageMagickdirectly.ImageMagickversion 6.8 is installed on AWS lambda base images by default. It took a while and a lot of googling and experimentation to figure out the error what the error was from. I found a StackOverflow question which was pivotal. It held vital information and pointed to a blog post on the AWS blog which talked about upcoming changes to the Lambda execution environment and a migration window. There was only one problem.We were at the very end of the migration window.
Turns out Amazon likely removed a module referenced by
pdf.la, which makes it so converting PDFs to images using ImageMagick no longer works on AWS Lambda. Now, the fix to this was essentially to use GhostScript instead to convert the PDFs to images, and then still useImageMagickto resize the images. The steps I followed were (applicable to nodejs):- Include the
binandsharedirectories from https://github.com/sina-masnadi/lambda-ghostscript into our Lambda function, so we had a compiled version of GhostScript that worked on AWS Lambda. - Change the JS code to call the GhostScript command to convert the PDF (sample below, command here)
- Upload the new code to lambda and make sure everything still worked (it did!)
The answer on the StackOverflow question above is similar to the process I followed but I didn’t bother with lambda layers. Here is what our JS function to convert the PDF to image looks like:
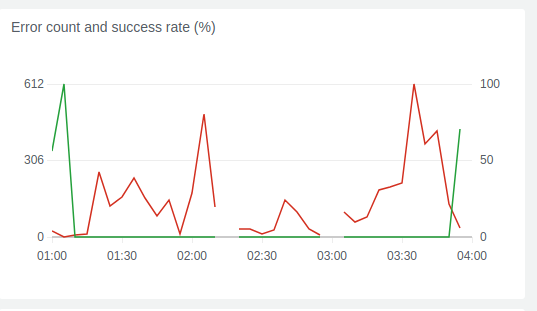
// tempFile is the path to the PDF to convert. make sure
// your path to the ghostscript binary is set correctly!
function gsPdfToImage(tempFile, metadata, next) {
  console.log('Converting to image using GS');
  console.log('----------------------------')
  console.log(execSync('./bin/gs -sDEVICE=jpeg -dTextAlphaBits=4 -r128 -o ' + tempFile.replace('.pdf', '.jpeg') + ' ' + tempFile).toString());
  next(null, tempFile.replace('.pdf', '.jpeg'), metadata);
}
After I put the fix in place all the errors went away! Lesson learned for next time…pay more attention to the AWS blog! Here is our Lambda function success/error rate chart for last Friday (errors in red). It’s easy to see where the fix went live:
- Include the
-
Rails Forms with Virtus and ActiveModel
I absolutely HATED doing forms in Rails, until we came across this method of doing them at work. Our goal was to make forms simple to set up and to have clear logic and separation of concerns. We were using Reform at first, and although it worked well for simple one-to-one form-to-model relationships, it quickly fell apart with more complex model relationships were involved. As well as this, if there were complex validations or different logic paths when saving the forms, things quickly fell apart. And there was no way to control the internal data structure of the form. Enter Virtus and ActiveModel.
read more... -
Subset Sum Problem in Ruby
I came across a bizarre data storage decision in a recent data migration. For context, in Australia there is a kind of government demographic survey that must be reported to by certain organisations. One of the data points is “Qualifications Achieved” or something to that affect, which accepts a comma-separated list of values. For example, the qualifications and their values are similar to:
524 - Certificate I
521 - Certificate II
514 - Certificate III
410 - Advanced Diploma
008 - Bachelor Degree
If a person had achieved a Certificate III and a Bachelor, you would report
514,008for that person to the government, for that data point. In the database in question there was a column which stored a single value. In this case it was 522, which is514 + 008. So, if I wanted to break apart this number into its component parts to store it a bit more sensibly, I needed to figure out which of the source numbers added up to the target number.I’m sure any developer reading this has had a problem where they are sure there is an answer, but they just don’t know what to search for. After some Googling it turns out this is called the subset sum problem. And someone had thoughtfully made an implementation in ruby which I could use:
http://ruby-subsetsum.jeremyevans.net
Note that in my case I needed only one output set, which worked because all the number combinations in my source set of numbers provide a unique result. E.g. for the numbers above no combination except
514 + 008adds up to 522. If you need it to this algorithm also returns multiple number sets that add up to the total.So, I took the algorithm, took my source numbers for each different data point, and my totals from the database, and it spat out the correct combinations!
1053 = 008 + 521 + 524. Aren’t algorithms magic sometimes?
| 1 // 11 | Next >> |
Want to read regular updates? Subscribe via RSS!